VBA Excel
Excel is a Microsoft application used to work with spreadsheets. VBA is embedded in the Excel application and can be used to work programmatically with Excel. The Excel Object Library contains classes that make working with Excel in VBA possible. The classes in the Excel Object Library are referred to as the Excel Object Model. When using VBA within Excel, a reference is automatically included to the Excel Object Library.
Excel Object Model
The Excel Object Model contains classes that make working with Excel in VBA possible. The Excel Object Model contains many classes but the general overview of the Excel Object Model is Application → Workbook → Worksheet → Range.
*The VBProject class is defined in the VBIDE library but is a property of the Workbook object.
**The FileDialog class is defined in the Office library but is a property of the Excel.Application object.
Context
The place where VBA code is written determines the implied context when referring to classes. For example, when using VBA in Excel and referring to the Application object, it is implied that Application and Excel.Application are the same object. However, when using VBA in another application to work with Excel, it is necessary to qualify references to avoid naming collisions with classes in the other application. Using qualified references requires that a reference is set to the library where the classes are defined. If a reference cannot be set, late-binding can be used instead.
Public Sub Example()

    '''In Excel

    Debug.Print Application Is Excel.Application 'Prints: True

End Sub
Public Sub Example()
'''In Outlook
'Reference to Excel Object Library is required
Debug.Print Application Is Excel.Application 'Prints: False
Debug.Print Application Is Outlook.Application 'Prints: True
End SubTo retrieve the Excel Application object from another application, attempt to retrieve the running application and if that fails start a new instance of the application.
Public Function GetExcelApp() As Object

    On Error Resume Next
    Set GetExcelApp = GetObject(, "Excel.Application")
    On Error GoTo 0

    If GetExcelApp Is Nothing Then
        Set GetExcelApp = CreateObject("Excel.Application")
    End If

End Function
Application
The Application object is the top-level object in the Excel Object Model which represents the Excel Application itself. The Application object contains information, settings, and functionality of the Excel application.
Application-Level Settings
Certain properties of the Application object can be changed which alters the way Excel behaves. These properties can sometimes be set manually from the Options menu or programmatically with VBA.
The ScreenUpdating property can be set to False to prevent the screen from updating while a macro is running. Then it can be set back to True to allow the updates to take place. Disabling screen updating while a macro is running can improve performance and speed as well as prevent the screen from flickering while code is executing.
The EnableEvents property can be set to False to prevent events from being triggered when a macro is running. At times it is necessary to disable events to avoid infinite loops. Other times it may be unnecessary for events to be running while code is executing. Set the property back to True at the end of the macro to re-enable normal event behavior.
The DisplayAlerts property can be set to False to prevent Excel alert messages from popping up while a macro is running. The property should be set back to True at the end of the macro to allow Excel pop-up alerts.
The Calculation property can be set to prevent formulas from recalculating while a macro is running. In Excel there are volatile functions that update whenever any change is made on the worksheet. This can be unnecessary and very inefficient. After the macro finishes running the Calculate method can be called on the sheet and the Calculation property can be set to xlCalculationAutomatic.
Public Sub Example()

    Application.ScreenUpdating = False
    Application.EnableEvents = False
    Application.DisplayAlerts = False
    Application.Calculation = xlCalculationManual

    'Code statements

    Application.Calculation = xlCalculationAutomatic
    Application.DisplayAlerts = True
    Application.EnableEvents = True
    Application.ScreenUpdating = True

End Sub
WorksheetFunction
The WorksheetFunction object can be used to call Excel spreadsheet functions in VBA.
Public Sub Example()

    Dim TheSum As Double

    TheSum = Application.WorksheetFunction.Sum(1, 2, 3, 4, 5)

End Sub
Run
The Run method is used to call a procedure based on a string representing the procedure's name. The Run method can be used to call a procedure in a similar way to a callback function.
Option Explicit

Public Sub Example()

    Dim Arr(0 To 9) As Long
    Arr(0) = 1
    Arr(1) = 2
    Arr(2) = 3
    Arr(3) = 4
    Arr(4) = 5
    Arr(5) = 6
    Arr(6) = 7
    Arr(7) = 8
    Arr(8) = 9
    Arr(9) = 10

    OperateOnValues Arr, "Square"

    PrintArray Arr

End Sub

Public Sub OperateOnValues(Arr As Variant, Callback As String)
    Dim i As Long
    For i = LBound(Arr) To UBound(Arr)
        Arr(i) = Application.Run(Callback, Arr(i))
    Next i
End Sub

Public Function Square(Num As Long) As Long
    Square = Num * Num
End Function

Public Sub PrintArray(Arr As Variant)
    Dim i As Long
    For i = LBound(Arr) To UBound(Arr)
        Debug.Print Arr(i)
    Next i
End Sub
Evaluate
The Evaluate method can be used to evaluate formulas, cell references, chart elements, and form controls. Square bracket syntax, [expression], can be used instead of using Application.Evaluate(expression). Evaluate can evaluate worksheet formulas that return an array and it can evaluate array literals.
Public Sub Example()

    'Evaluate range reference
    Debug.Print Application.Evaluate("A1").Value2
    Debug.Print [A1].Value2


    'Evaluate worksheet formula
    Debug.Print Application.Evaluate("Sum(1, 2, 3, 4, 5)")
    Debug.Print [Sum(1, 2, 3, 4, 5)]


    'Evaluate array literal
    Dim Arr()
    Arr = Application.Evaluate("{1,2,3;4,5,6;7,8,9}")
    Arr = [{1,2,3;4,5,6;7,8,9}]

    Debug.Print Arr(1, 1)
    Debug.Print Arr(1, 2)
    Debug.Print Arr(1, 3)

    Debug.Print Arr(2, 1)
    Debug.Print Arr(2, 2)
    Debug.Print Arr(2, 3)

    Debug.Print Arr(3, 1)
    Debug.Print Arr(3, 2)
    Debug.Print Arr(3, 3)

End Sub
Union
The Union method is used to combine two or more ranges into a single Range object. The ranges do not need to be contiguous.
Public Sub Example()

    Dim Rng As Range

    Set Rng = Union(Range("A1"), Range("A2")) 'Contiguous Range
    Rng.Interior.Color = vbRed

    Set Rng = Union(Range("C1"), Range("C3")) 'Noncontiguous Range
    Rng.Interior.Color = vbGreen

End Sub
Intersect
The Intersect method returns the Range where two or more Ranges intersect. If none of the Ranges intersect the method returns Nothing. If Ranges from more than one Worksheet are passed, an error occurs.
Public Sub IntersectingRanges()

    Dim WS As Worksheet
    Set WS = Activesheet

    Dim R1 As Range
    Set R1 = WS.Range("A1:C5")

    Dim R2 As Range
    Set R2 = WS.Range("C1:E5")

    Dim I As Range
    Set I = Application.Intersect(R1, R2)

    If I Is Nothing Then
        Debug.Print "Ranges do not intersect."
    Else
        Debug.Print I.Address
    End If

End Sub
Volatile
The Volatile method is used to make a User-Defined Function volatile. Volatile functions are recalculated whenever any change occurs on the Worksheet.
Public Function AddTwoNumbers(Num1 As Double, Num2 As Double) As Double

    Application.Volatile

    AddTwoNumbers = Num1 + Num2

End Function
SendKeys
The SendKeys method is used to send keyboard keys to the active application.
Public Sub Example()

    'Add text to the first cell

    Application.SendKeys "^{HOME}"
    Application.SendKeys "Hello, World!"
    Application.SendKeys "{ENTER}"

End Sub
OnKey
The OnKey method is used to assign a macro to a keyboard key.
Public Sub Example()

    'Assign keyboard shortcut
    Application.OnKey "^a", "DisplayMessage"

    'Disable keyboard shortcut
    Application.OnKey "^a", ""

    'Return keyboard shortcut to default
    Application.OnKey "^a"

End Sub

Public Sub DisplayMessage()
    Msgbox "Hello, World"
End Sub
InputBox
The InputBox method is used to display an input box and get user input. Acceptable data types can be specified by the Type parameter.
Public Sub Example()

    Dim UserInput
    UserInput = Application.InputBox("Enter Number", Type:=1 + 2) 'Accepts Number or Text

    Debug.Print UserInput

End Sub
Speech
The Speech object can be used to make Excel talk.
Public Sub Example()

    Application.Speech.Speak "Hello World"

End Sub
FileDialog
The FileDialog property is used to create a FileDialog object which users can use to select files and folders from the file system.
Public Sub Example()

    'Get file path from file picker FileDialog

    Dim FD As FileDialog
    Set FD = Application.FileDialog(msoFileDialogFilePicker)
    With FD
        .AllowMultiSelect = False
        If .Show Then
            Debug.Print .SelectedItems(1)
        Else
            Debug.Print "No file selected."
        End If
    End With

End Sub
Dialogs
The Dialogs property is used to create a Dialog object object which can represent dialog windows.
Public Sub Example()

    'Get color from EditColor Dialog

    Dim ColorIndex  As Long
    Dim EditColor   As Dialog
    Dim Result      As Boolean
    Dim ColorValue  As Long

    ColorIndex = 56
    Set EditColor = Application.Dialogs(xlDialogEditColor)
    Result = D.Show(ColorIndex)
    ColorValue = ThisWorkbook.Colors(ColorIndex)
    Debug.Print ColorValue

End Sub
Properties
There are a number of useful properties that can be used to get information about the Excel application and the user's platform.
The PathSeparator property returns the path separator character for the user's system. On Windows this will be a "\" and on Mac this will be a "/".
The OperatingSystem property returns a string describing the user's operating system.
The UserName property returns the UserName of the Excel user.
Windows
The Window object represents a window. The Windows collection object contains a collection of Window objects and can be accessed through the Application.Windows property. The Window object can be used to control various settings and features of windows in Excel. Some properties that can be controlled are Split, FreezePanes, DisplayGridlines, and DisplayFormulas.
Public Sub Example()

    'Toggle Gridlines

    Dim WS As Worksheet
    Set WS = ActiveSheet
    WS.Activate

    Dim W As Window
    Set W = Application.ActiveWindow

    W.DisplayGridlines = Not W.DisplayGridlines

End Sub
Workbooks
The Workbook object represents an Excel Workbook. The Workbooks collection object contains all open Workbooks under the Excel Application. To access the Workbooks collection use the Application.Workbooks property.
Referring to Workbooks
To refer to a Workbook, use the workbook's Name or Index in the Workbooks collection. When referring to a Workbook by name, the file extension may be required if file extensions are shown on the user's system in the File Explorer. Workbook indexes start at 1.
Public Sub Example()

    Dim WB As Workbook

    Set WB = Workbooks("Example.xlsx")

    Set WB = Workbooks(1)

End Sub
Every Workbook has its own VBA Project associated with it. To reference the Workbook containing the VBA Project where the code is running, use the ThisWorkbook property.
Public Sub Example()

    Dim WB As Workbook

    Set WB = ThisWorkbook

End Sub
Iterating Over Workbooks
A For Next or For Each loop can be used to iterate over the Workbooks collection.
Public Sub Example()

    Dim i As Long
    For i = 1 To Workbooks.Count
        Debug.Print Workbooks(i).Name
    Next i

    Dim WB As Workbook
    For Each WB In Workbooks
        Debug.Print WB.Name
    Next WB

End Sub
Open Workbook
To Open a Workbook use the Workbooks.Open method.
Public Sub Example()

    Dim WB As Workbook
    Set WB = Workbooks.Open("C:\Example.xlsx")

End Sub
Add Workbook
To create a Workbook use the Workbooks.Add method.
Public Sub Example()

    Dim WB As Workbook
    Set WB = Workbooks.Add

End Sub
Save Workbook
To save a Workbook use the Workbook.SaveAs and Workbook.Save methods. Use the XlFileFormat enum to determine the file format to use when saving.
Public Sub Example()

    Dim WB As Workbook
    Set WB = Workbooks.Add

    WB.SaveAs "C:\Example.xlsx", xlWorkbookDefault

    WB.Range("A1").Value2 = "Hello, World!"

    WB.Save

End Sub
Close Workbook
To close a Workbook use the Workbook.Close method.
Public Sub Example()

    Dim WB As Workbook
    Set WB = Workbooks.Open("C:\Example.xlsx")

    WB.Close

End Sub
Worksheets
The Worksheet object represents a Worksheet within a Workbook. The Worksheets collection object contains a collection of all Worksheets within a given Workbook. Use the Workbook.Worksheets property to access the Workbooks collection.
Referring To Worksheets
Worksheets can be referenced from the Worksheets collection by the Name property, Index property, or CodeName property. The Name and CodeName appear side by side in the project explorer in the Visual Basic Editor. The Name property is the name that appears on the sheet tab in Excel. The CodeName property can be set in the properties window for the Worksheet object. If a Worksheet is referred to by its Name or Index, the sheet may be moved or renamed which can break code that relies on these properties. It may be better when possible to set the CodeName property of Worksheets in the Visual Basic Editor and refer to sheets by CodeName.
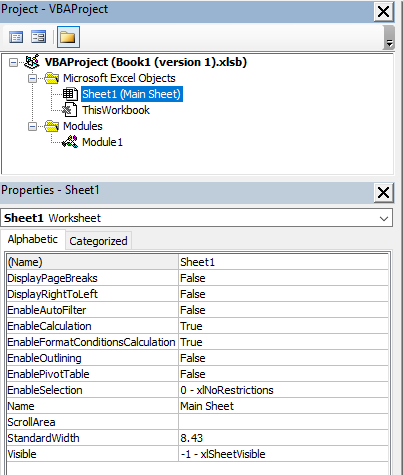
Public Sub Example()

    Dim WS As Worksheet

    Set WS = Worksheets("Main Sheet") 'Name
    Set WS = Worksheets(1) 'Index
    Set WS = Sheet1 'CodeName

    Debug.Print WS.Name
    Debug.Print WS.Index
    Debug.Print WS.CodeName

End Sub
Iterating
A For Next or For Each loop can be used to iterate over the the Worksheets collection.
Public Sub Example()

    Dim i As Long
    For i = 1 To Worksheets.Count
        Debug.Print Worksheets(i).Name
    Next i

    Dim WS As Worksheet
    For Each WS In Worksheets
        Debug.Print WS.Name
    Next WS

End Sub
Add
Worksheets can be added to a Workbook using the Worksheets.Add method.
Public Sub Example()

    'Add Worksheet after last sheet

    Dim WB As Workbook
    Dim WS As Worksheet

    Set WS = WB.Worksheets.Add(After:=WB.Worksheets(WB.Worksheets.Count))

End Sub
Copy
To copy a Worksheet use the Worksheet.Copy method.
Public Sub Example()

    Dim WB As Workbook
    Set WB = ThisWorkbook

    Dim WS As Worksheet
    Set WS = WB.Worksheets(1)

    Dim WSCopy As Worksheet
    Set WSCopy = WS.Copy(After:=WB.Worksheets(WB.Worksheets.Count))

End Sub
Move
To move a Worksheet use the Worksheet.Move method.
Public Sub Example()

    Dim WB As Workbook
    Set WB = ThisWorkbook

    Dim WS As Worksheet
    Set WS = WB.Worksheets(WB.Worksheets.Count)

    WS.Move Before:=WB.Worksheets(1)

End Sub
Delete
To Delete a Worksheet use the Worksheet.Delete method. When a sheet is deleted an alert pops up warning that the sheet will be permanently deleted. To prevent this pop-up, disable alerts by setting the Application.DisplayAlerts property to False. After the sheet is deleted, alerts can be re-enabled by setting the property to True.
Public Sub Example()

    'Suppress alert that sheet will be deleted permanently
    Application.DisplayAlerts = False

    WS.Delete

    'Unsuppress alerts
    Application.DisplayAlerts = True

End Sub
Naming
The Worksheet.Name property represents the worksheet name displayed on the sheet tab in Excel. The Worksheet.CodeName property represents the Worksheet object's name in code and can be used directly in code as an object variable.
Public Sub Example()

    Dim WB As Workbook
    Set WB = ThisWorkbook

    Dim WS As Worksheet
    Set WS = WB.Worksheets.Add(After:=WB.Worksheets(WB.Worksheets.Count))

    WS.Name = "Main"

    Debug.Print WS.Name
    Debug.Print WS.CodeName

End Sub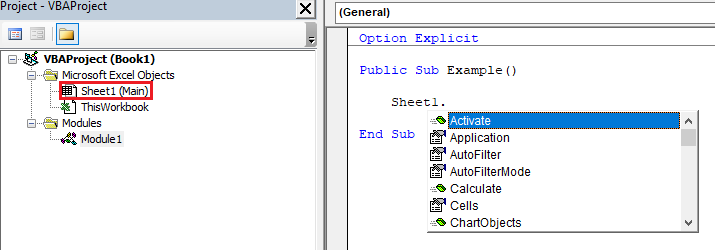
If the Worksheet name is already taken an error will occur. It may be necessary to create a function to name a Worksheet which handles naming collisions.
Option Explicit

Public Sub Example()

    Dim WS As Worksheet

    Set WS = ThisWorkbook.Worksheets.Add
    NameWorksheet WS, "Test"

    Set WS = ThisWorkbook.Worksheets.Add
    NameWorksheet WS, "Test"

End Sub

Public Sub NameWorksheet(WS As Worksheet, WSName As String)

    Dim WSName1 As String
    WSName1 = WSName

    Dim WB As Workbook
    Set WB = WS.Parent

    Dim WSs As Sheets
    Set WSs = WB.Worksheets

    Dim WSCount As Long
    WSCount = WSs.Count

    Dim IsNamed As Boolean
    Dim c As Long
    Do While Not IsNamed

        Dim NameFound As Boolean
        NameFound = False

        Dim i As Long
        For i = 1 To WSCount
            If WSName1 = WSs(i).Name Then
                NameFound = True
                Exit For
            End If
        Next i

        If NameFound Then
            c = c + 1
            WSName1 = WSName & " (" & c & ")"
        Else
            WS.Name = WSName1
            IsNamed = True
        End If

    Loop

End Sub
Ranges
The Range object represents a range of cells on a Worksheet.
Cells Property
The Worksheet.Cells and Range.Cells properties can be used to return a Range object given a row and column index. With the Worksheet.Cells property the row and column indexes are relative to the entire worksheet. With the Range.Cells property the row and column indexes are relative to the Range. The Cells property is useful when iterating over rows and columns.
Public Sub Example()

    Dim WS As Worksheet
    Set WS = ThisWorkbook.Worksheets(1)

    Dim i As Long
    For i = 1 To 10
        WS.Cells(i, 1).Value2 = i
    Next i

End Sub
Public Sub Example()
Dim Rng As Range
Set Rng = ThisWorkbook.Worksheets(1).Range("B11:B20")
Dim i As Long
For i = 1 To 10
Rng.Cells(i, 1).Value2 = i
Next i
End SubCell Values
The Value property of the Range object returns the value stored in a cell.
The Value2 property of the Range object returns the value stored in a cell. Currency and Date types are returned as their underlying numerical values and not the correctly formatted Currency or Date.
The Text property of the Range object returns the text that is currently displayed in the cell.
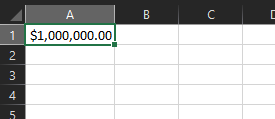
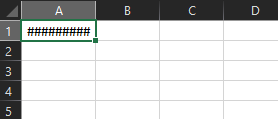
Public Sub Example()

    'Prints 1000000, Currency
    Debug.Print Range("A1").Value, TypeName(Range("A1").Value)

    'Prints 1000000, Double
    Debug.Print Range("A1").Value2, TypeName(Range("A1").Value2)

    'Prints $1,000,000.00, String
    'Prints #########, String
    Debug.Print Range("A1").Text, TypeName(Range("A1").Text)

End Sub
Formulas
The Formula and FormulaR1C1 properties can be used to add or read the formula in a cell. The Formula property uses A-1 style cell referencing and the FormulaR1C1 property uses R1C1 style cell referencing.
Public Sub Example()

    Range("B1").Formula = "=SUM($A$1:$A$10)"

    Range("B1").FormulaR1C1 = "=SUM(RC[-1]:R[9]C[-1])"

End Sub
Copy and Paste
Ranges can be copied and pasted using the Copy method and the PasteSpecial method.
Public Sub ExampleRange()

    'Copy directly
    Range("A1").Copy Range("B1")

    'Copy and paste
    Range("A1").Copy
    Range("B1").PasteSpecial xlPasteValues

End Sub
Formatting
The Interior object allows properties related to the Range's interior color to be set. Use the Range.Interior property to get the Interior object for a Range.
The Font object allows properties about a Range's font to be set. Use the Range.Font property to get the Font object for a Range.
The Borders object allows properties about a Range's borders to be set. Use the Range.Borders property to get the Borders object for a Range.
Public Sub Example()

    With Range("A1")

        With .Interior
            .Color = vbRed
        End With

        With .Font
            .Bold = True
            .Italic = True
        End With

        With .Borders
            .LineStyle = xlContinuous
            .Color = vbBlue
        End With

    End With

End Sub
Conditional Formatting
The FormatConditions object is used to add Conditional Formatting to a Range. Use the Range.FormatConditions property to get the FormatConditions object for a Range.
Public Sub Example()

    'Highlight Duplicates

    With Range("A:A")
        .FormatConditions.AddUniqueValues
        .FormatConditions(.FormatConditions.Count).SetFirstPriority
        .FormatConditions(1).DupeUnique = xlDuplicate
        With .FormatConditions(1).Font
            .Color = -16383844
            .TintAndShade = 0
        End With
        With .FormatConditions(1).Interior
            .PatternColorIndex = xlAutomatic
            .Color = 13551615
            .TintAndShade = 0
        End With
        .FormatConditions(1).StopIfTrue = False
    End If

End Sub
NumberFormat
The NumberFormat property is used to set the data type of a range. The format codes for the NumberFormat property are the same codes as the codes in the Format Cells dialog in Excel.
| Format | Format Code |
|---|---|
| General | "General" |
| Number | "0.00" |
| Currency | "$#,##0.00" |
| Accounting | "_($* #,##0.00_);_($* (#,##0.00);_($* ""-""??_);_(@_)" |
| Short Date | "m/d/yyyy" |
| Long Date | "[$-x-sysdate]dddd, mmmm dd, yyyy" |
| Time | "[$-x-systime]h:mm:ss AM/PM" |
| Percentage | "0.00%" |
| Fraction | "# ?/?" |
| Scientific Notation | "0.00E+00" |
| Text | "@" |
| ZIP Code | "00000" |
| ZIP Code + 4 | "00000-0000" |
| Phone Number | "[<=9999999]###-####;(###) ###-####" |
| Social Security Number | "000-00-0000" |
Public Sub Example()

    'Format cell as Text

    Range("A1").NumberFormat = "@"

End Sub
CurrentRegion
The CurrentRegion property can be used to reference a region of rows and columns where there is connected data. The intersection of a blank row and a blank column divides regions.

Public Sub Example()

    Dim Rng As Range
    Set Rng = Range("A1").CurrentRegion

    Debug.Print Rng.Address 'Prints $A$1:$C$4

End Sub
Resize
The Resize property is used to resize a Range object. The Resize property can be used to resize ranges so that arrays can be directly assigned to the range.
Public Sub Example()

    Dim Arr(0 To 2, 0 To 2) As Long

    Arr(0, 0) = 1
    Arr(0, 1) = 2
    Arr(0, 2) = 3

    Arr(1, 0) = 4
    Arr(1, 1) = 5
    Arr(1, 2) = 6

    Arr(2, 0) = 7
    Arr(2, 1) = 8
    Arr(2, 2) = 9

    Dim RowCount As Long
    RowCount = UBound(Arr, 1) - LBound(Arr, 1) + 1

    Dim ColumnCount As Long
    ColumnCount = UBound(Arr, 2) - LBound(Arr, 2) + 1

    Range("A1").Resize(RowCount, ColumnCount).Value = Arr

End Sub
PivotTables And Charts
PivotTables and Charts are a very useful way to view and manipulate data in Excel.
PivotCaches
The PivotCache object contains the data used to create PivotTables. PivotCaches are stored at the Workbook level. The PivotCaches collection object contains all the PivotCache objects for a given Workbook. Use the Workbook.PivotCaches method to return the PivotCaches collection for a Workbook. To create a new PivotCache use the PivotCaches.Create method. Use the XlPivotTableSourceType enum to specify the type of data source for the new PivotCache.
PivotTables
Once a PivotCache is created, it can be used to create a PivotTable. The PivotTable object represents a PivotTable on a Worksheet. The PivotTables collection object contains all the PivotTables for a Worksheet. Use the Worksheet.PivotTables method to get the PivotTables collection for a Worksheet. To create a new PivotTable use the PivotTables.Add or PivotCache.CreatePivotTable method. To add fields to a PivotTable use the PivotTable.AddFields method and the PivotTable.AddDataField method.
Charts
Charts can be created as their own stand-alone sheet or they can be embedded in a Worksheet.
To create a stand-alone chart sheet get a Charts or Sheets collection using the Workbook.Charts property and use the Charts.Add2 or Sheets.Add method respectively. When using the Sheets.Add method specify the type as a chart using the XlSheetType enum. Use the Chart.SetSourceData method and pass the TableRange property of the PivotTable.
To create an embedded chart, create a Shape object using the AddChart2 method of the Worksheet's Shapes collection object property. Retrieve the Chart object from the Shape using the Shape.Chart property. Finally, set the source data of the Chart using the Chart.SetSourceData method with the TableRange property of the PivotTable.
Example
Consider an example using gardeners and their harvest output crops.
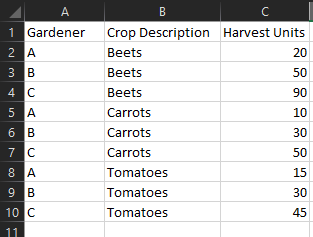
Public Sub CreatePivotTableAndCharts()

    Dim PCaches      As PivotCaches
    Dim PCache       As PivotCache
    Dim NewWS        As Worksheet
    Dim PTables      As PivotTables
    Dim PTable       As PivotTable
    Dim PChartShape  As Shape
    Dim PChart       As Chart
    Dim PChartSheet  As Chart

    'Create PivotCache
    Set PCaches = ThisWorkbook.PivotCaches
    Set PCache = _
    PCaches.Create(xlDatabase, ThisWorkbook.Worksheets(1).Range("A1").CurrentRegion)

    'Create PivotTable
    Set NewWS = ThisWorkbook.Worksheets.Add
    Set PTables = NewWS.PivotTables
    Set PTable = PTables.Add(PCache, NewWS.Range("A1"))
    PTable.AddFields RowFields:=Array("Gardener", "Crop Description")
    PTable.AddDataField PTable.PivotFields("Harvest Units"), "Sum of Harvest Units", xlSum

    'Create Embdedded Chart
    Set PChartShape = NewWS.Shapes.AddChart2(XlChartType:=xlColumnStacked)
    Set PChart = PChartShape.Chart
    PChart.SetSourceData PTable.TableRange1

    'Create Sheet Chart
    Set PChartSheet = ThisWorkbook.Charts.Add
    PChartSheet.SetSourceData PTable.TableRange1

End Sub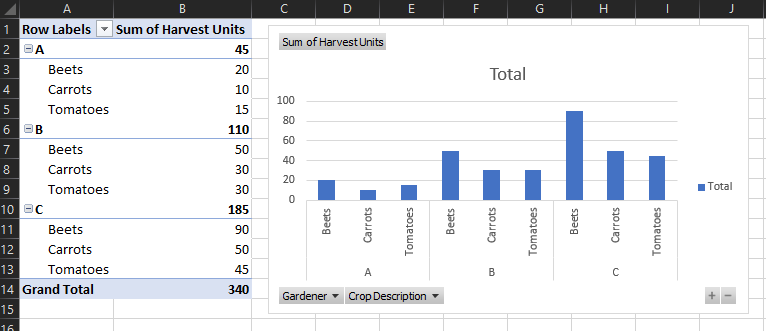
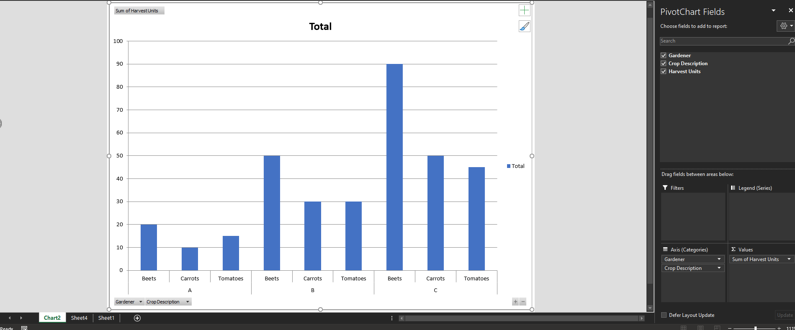
ListObjects
The ListObject class is used to represent a table in Excel. The ListObjects collection object contains all ListObject objects in a Worksheet. Use the Worksheet.ListObjects property to retrieve the ListObjects collection object for a Worksheet. A ListObject can be created using the ListObjects.Add method. Specify the type of data source using the XlListObjectSourceType enum.
Public Sub Example()

    'Create table from Range

    Dim WS As Worksheet
    Set WS = ThisWorkbook.Worksheets(1)

    Dim LO As ListObject
    Set LO = WS.ListObjects.Add(xlSrcRange, WS.Range("A1").CurrentRegion, , xlYes)
    LO.Name = "Table1"

End Sub
QueryTables
The QueryTable object is used to import source data into Excel. The QueryTables collection object contains all QueryTable objects for a Worksheet. Use the Worksheet.QueryTables property to retrieve the QueryTables collection for the Worksheet. A QueryTable object can be created using the QueryTables.Add method. Provide a connection string for the specific data source when creating a QueryTable.
Public Sub Example()

    'Add QueryTable from Excel sheet

    Dim ExcelFilePath As String
    ExcelFilePath = "C:\example.xlsx"

    Dim ConnectionString As String
    ConnectionString = _
        "ODBC;" & _
        "Driver={Microsoft Excel Driver (*.xls, *.xlsx, *.xlsm, *.xlsb)};" & _
        "DBQ=" & ExcelFilePath & ";"

    Dim WS As Worksheet
    Set WS = ThisWorkbook.Worksheets(1)

    Dim QT As QueryTable
    Set QT = WS.QueryTables.Add(ConnectionString, WS.Range("A1"), "SELECT * FROM [Sheet1$]")
    QT.Refresh

End Sub
Public Sub Example()
'Add QueryTable from Text/CSV file
Dim WS As Worksheet
Set WS = ThisWorkbook.Worksheets(1)
Dim TextFilePath As String
TextFilePath = "C:\example.csv"
Dim ConnectionString As String
ConnectionString = "TEXT;" & TextFilePath
Dim QT As QueryTable
Set QT = WS.QueryTables.Add(ConnectionString, WS.Cells(1, 1))
WS.Cells.NumberFormat = "@"
With QT
.TextFileConsecutiveDelimiter = False
.TextFileCommaDelimiter = True
.TextFileParseType = xlDelimited
.TextFileTextQualifier = xlTextQualifierDoubleQuote
'MUST Assign TextFileColumnDataTypes to Avoid Data Type Guessing
.TextFileColumnDataTypes = Array(xlTextFormat, xlTextFormat, xlTextFormat)
.Refresh
.SaveData = False
.Delete
End With
End Sub